Tuesday, March 29, 2011

Crowd Pleasers

Some dishes are universally loved.  These tend to be comfort-centric, carb-laden, just-like-Mom's traditional recipes that trendy Portland chefs like to "reimagine" and "deconstruct" with burrata, fava bean emulsions and palm sugar-sanded pancetta cracklins.  I don't hate these familiar flavors, but I do try and avoid making them too often.  It just seems redundant.  We're only allotted so many dinners in a lifetime, why not try and have something original? 

Still, I try to compromise and make one of these recipes that Matt's always clamoring for every once and a while.  Last time it was the meatloaf that ended up changing my tune.  On Sunday it was Italian stuffed shells.  I always think of it as the standard dish to cover in foil and bring to new moms/mourning widows/hair transplant recoverees.  It freezes as smooth as ice, so they're ideal to make in a gigantic batch and then pack away for upcoming weeknights.  After our kabob adventure, I thought it was only fair to go back to the Snuggie of dinners. 

I did stuffed shells two ways--a hearty sausage version, and a lightened vegetarian spin.  Even if I wasn't making options for me and my eating habits, it's still nice to have more than one option in the sprawling sheet pan.  One large container of ricotta will fill a cooked pasta box of shells, so what you do in between is up to you.  Nutmeg is essential; it riffs off the natural nuttiness of fresh ricotta.  Don't be shy with the marinara, either.  They don't taste great dry.  It looks like a lot when you're layering it above and below the shells, but they get much dryer in the oven.

I served these with a salad tossed with the Dark Cherry vinegar I scored at my new obsession, Benessere.  That's a blog for another day, though.  It deserves the unsullied spotlight. After a hefty Sunday night dinner, we've both eaten shell leftovers for two days straight and I have to admit, I'm still not really sick of them.  They taste almost better reheated, which doesn't make a lot of sense--they don't really marinade flavors.  Maybe it just feels extra comforting to pull something that tastes so real from a microwave.  That's why we've been packing them up for new mamas for so many years, after all.   

Stuffed Shells Two Ways
1 box dry pasta shells
2 jars marinara sauce (extra bonus awesome points if you canned your own!!)
1 32 oz container of regular or lowfat ricotta cheese
1 16 oz Mozzarella cheese, grated
1/2 cup grated Parmigiano Reggiano
1/2 tsp nutmeg, divided
2 eggs
1 tbsp lemon juice
1 tbsp & 1/2 tbsp Penzey's Tuscan Sunset seasoning (or other Italian-style seasoning), divided
1/2 lb sweet Italian sausage
1/2 small zucchini, grated
1 cup frozen spinach, thawed
Salt and pepper to taste

Preheat oven to 350.  Spread 1 jar of marinara sauce evenly on the bottom of a large Pyrex pan. 

Cook the shells according to package directions until just under al dente.  Let cool in the colander as you assemble the 2 fillings.

Meat Filling:  Cook and crumble sausage and Tuscan Sunset seasoning  in pan over medium heat.  Cool slightly.  Mix cooled sausage with 1/2 of the ricotta container, 1 egg, 1/4 tsp nutmeg, 1 cup of grated mozzarella cheese, salt and pepper. 

Vegetable Filling:  Mix shredded zucchini, 1 egg, 1 cup shredded mozzarella, 1/4 tsp nutmeg, lemon juice, 1/2 tbsp Italian seasoning, frozen spinach and salt and pepper with the remaining ricotta.  (Note:  To make even healthier, you could omit the mozz and just have shredded zucchini instead.  I, however, cheated this time around.) 

Generously stuff half the shells with the meat filling, which should yield about 16 shells.  Repeat with vegetable mixture.  You can really get that filling in there.  It's not going anywhere, and it's not going to explode in a pot of boiling water like over-stuffed ravioli.  Don't be shy.  Everybody likes their shells stuffy.  Line each evenly in pan, 4 by 8.  Alternatively, you could put these in 2 smaller square baking dishes and freeze one just like that. 

After assembly, cover the shells with the other jar of marinara, remaining mozzarella and Parmigiano Reggiano.  Bake for about 25-30 minutes, until the sauce is bubbling and the cheese is molten lava gooey.  Garnish with fresh basil.

Leftovers can be promptly frozen after cooling, or you can freeze the shells before baking.

Saturday, March 26, 2011

Dinner on a Stick

It may not be warm in Portland, but the sun has intermittently been out!  It makes me crave barbecue and citrus, as opposed to the slow-cook and braising goodness that's been warming us this winter.  Our grilled Mediterranean-ish dinner tonight was a result of married inspirations:  a side dish craving and wonderful weather. 

The side dish I speak of was inspired by a jar of Trader Joe's peppadew peppers.  I remember meeting peppadews for the first time at my specialty food job, where they were just cutting into the culinary scene.  They're marinated in oil like other regular and roasted Italian and Greek-style peppers, but they have a flavor all their own.  A faint undercurrent of spiciness coupled with a savory sweetness make these the maraschino cherries of antipasti.  They taste fantastic simply stuffed with a small ball of fresh mozzarella or soft goat cheese as a snack, or they can be sliced up and added to sandwiches, salads, wraps and pasta. 

When I bought this new jar on Friday, I had an idea.  I bet peppadew hummus would be awesome.  I made that pumpkin hummus at Christmas, and I've been enchanted by the homemade hummus flavor possibilities ever since. 

What should we have with homemade hummus, I wondered.  Lamb chops would be phenomenal, but Matt doesn't like lamb near enough to justify the effort and expense.  My foray into lamby deliciousness needs some appreciative guests over (I'm looking at you, Brynne...).  I wasn't too happy with my last tagine, a flavor-lacking Cooking Light disappointment.  I just had a gyro-ish dinner earlier in the week during sandwichpalooza. 

What about kabobs?  It was a proposition tinged with danger.  I've been burned by kabobs, literally and figuratively, since our first apartment five years ago.  I remember making a bunch of kabobs and trying to char them on a chintzy little charcoal hibachi on that first patio.  I wasn't patient enough to wait for the coals to really heat up, so I threw the skewers on when the grill was still barely room temperature and they just kind of gelatinized on the grate.  I've had sticks break, salmon disintegrate, chicken stay raw.  We just hadn't been able to make it work too well.  However, at Christmas this year Matt got a barbecue set that came with four long, metal skewers to replace our toothpick-like wood versions.  Maybe the stability of the quality equipment would make this time different.

With a meal game plan in mind, I prepped the ingredients for food processing.  The basic recipe for hummus is extremely simple:  chickpeas, tahini (sesame paste), garlic, lemon, olive oil and salt.  All the customization goes from there.  You can change the chickpeas to white beans, change the olive oil to the oil from sundried tomato jars, add fresh herbs like basil or cilantro.  I added three whole peppadew peppers along with the jar's oil, coupled with my favorite extras:  cumin, smoked paprika, a pinch of cayenne and fresh parsley.  Homemade hummus needs a lot of tasting and adjusting to get the flavor the way you like it, so be ready to add a little extra lemon, salt, tahini or whatever as you puree and taste.  Make it ahead of time so it can chill in the fridge and marinate the spices a bit. 

We thawed steak and chicken for the kabobs, which I prepared to each of our tastes.  For lemon-and-complex-flavored hating Matt, I tossed the sliced steak with Pampered Chef's Crushed Peppercorn and Garlic Rub, salt and olive oil.  I got fancier and much more fun with the chicken, which was tossed in olive oil, fresh basil, parsley, lemon juice and Penzey's Tandoori spice.  Each bowl hit the fridge along with the hummus to marinade into flavorful perfection. 

I knew I was entering a new world of competent supplies just preparing the kabobs with the meat, thick zucchini chunks and red onion pieces.  Even the tough, uncooked summer squashes slid onto the metal kabobs without even the slightest effort.  I stabbed myself in the palm way too many times to count with the wooden ones.  Unlike the past, they were also destined to cook on an easy-to-heat and evenly cooking barbecue. 

While the couscous was fluffing on the counter I went out to check on Matt and the cooking.  He demonstrated his new kabob-flipping technique he's worked out to keep the vegetables and everything from plummeting into the fiery abyss--embracing the entire kabob with the barbecue tongs, so they all lift and turn at the same time.  We're all growing so much in our mad skills.

The hummus had all of the goodness and complexity of peppadews, and the chicken was perfect:  bright, moist and popping with freshness.  The steak was good, just kind of boring (although Matt hated the lemon chicken, so the options were good).  After a week of eating out and rainy-weather soups, it was great to embrace the alternative.  I've even got leftovers to brighten up inevitable Monday; a postcard from a weekend that's turning out to be fabulous.

Peppadew Hummus
1 can of garbanzo beans, drained and rinsed
1/3 cup tahini
2 tablespoons peppadew jar oil (or olive oil)
3 peppadew peppers, sliced in half
3 garlic cloves, sliced in half
1/2 of one lemon, juiced
1 tsp salt
1/2 tsp cumin
1/4 tsp paprika
Pinch of cayenne pepper
1 tablespoon fresh parsley, minced

Place all ingredients in food processor.  If it is too thick, add additional oil.  Taste hummus for spices, adjust according to taste.  Place in a sealed container and refrigerate for at least a 1/2 hour before serving.

Tabitha's Way Better Chicken Kabobs
2 boneless chicken breasts, sliced into large chunks
1/4 cup fresh basil chiffonade
2 tbsp fresh parsley, minced
The juice of 1 fresh lemon
1/3 cup olive oil
1 1/2 tbsp Penzey's Tandoori spice
Salt and pepper
1 small zucchini, sliced into large chunks
1/3 red onion, sliced into large chunks

Toss chicken chunks with basil, parsley, lemon, olive oil, Tandoori and salt and pepper to taste.  Refrigerate for at least half an hour and up to overnight. 

Remove from refrigerator.  Use to skewer 2 large metal skewers, alternating with zucchini and onion slices.  Grill about 7 minutes per side, until chicken is cooked through.  Serve with couscous, hummus, pita bread and a mojito.

Wednesday, March 23, 2011

So Bunderful

Sadly for me, there hasn't been so much time in the kitchen recently.  There seems to be less and less nights I have at home, which means I've been cooking fewer dinners at night and not spending the time to put breakfasts and lunches together for the next day.  When we are eating at home, it's usually something that can be made and eaten fast.  Not exactly the Eats of Eden way, but life will eventually regain its equilibrium.  Right now I'm working toward the future, and the future is needy. 

I've noticed that I have been eating quite a few meals between buns lately.  As the cheesy legend goes, Earl Sandwich started the portable culinary revolution while playing poker, and requesting a meal of meat and cheese between bread slices so he could keep playing.  Unlikely as it is to be true, it does provide a great metaphor for busy people's favorite meal:  put everything between the buns, I've gotta run.

In honor of Grad School's Top Ramen, I wanted to spend a moment honoring some of the best incarnations of the sandwich I've had recently. 

First off, I have to show Starbucks how it's done.  When one orders a veggie breakfast sandwich, they're expecting two simple things:  some kind of egg product and some kind of veggies.  Starbucks spent millions of development dollars to figure out half of this equation, but Noah's Bagels has it 100% right.  Their Asparagus and Mushroom Egg White Sandwich is served on a Bagel Thin, the secret to enjoying sandwich sensations while on a diet.  Sure, I'd love some thick slab of ciabatta or focaccia bread, but the calories and carbs are killer.  You get the taste and texture compromise.  So you get the sandwich back to your desk (well, that's where I get it back to), and open it up.  VEGETABLES EVERYWHERE!!!  And not just blah vegetables for vegetable's sake.  Crispy, toothsome pieces of asparagus and tender mushrooms.  It's all married with this delicious chipotle sauce that is smoky and wonderful.  I try to enjoy it, but I inhale it so fast I end up searching through piles of papers on my desk to try and find where I set it down last. 

If you're not watching it, try Noah's Santa Fe Egg Wrap.  That was my all-time favorite breakfast treat in the "before times."  It's basically a burrito (ah tortillas, the exotic sandwich) with spicy turkey sausage, chiles, roasted potatoes, and their jalapeno cream cheese that doubles as their best bagel spread.  It's what Almanzo Wilder would eat if Little House on the Prairie had a Noah's down the road.

When we were at Costco a couple weeks ago, Matt grabbed a box of Sabatino chicken patties from the "not frozen stuff but you can freeze it if you don't want to eat 12 of these today" section (between the Meat department and Produce That Will Inevitably Rot In Your Fridge.... you know what I'm talking about, right?).  Faced with having to make dinner last night while I was getting home late, he grabbed these hidden gems.  Neither of us had any idea what an unbelievable find we'd stumbled on.  Each chicken patty is blended with spinach and aged white cheddar cheese, which collects in these little cheese wells and oozes out every couple bites.  It's unlike any chicken sandwich I've ever had before.  It basically blends the best features of veggie burgers (texture, herbs, freshness) with the wonders of chicken.  And unlike some chicken/turkey burgers, these aren't a smidge dry. 

"We need more of these," I said as I oohed all over my patty on Bagel Thin with feta cheese, lettuce and red onion.  It's on my list; put it on yours, too!  They're packed in vacu-packs of 4, so you can take half of them right out of the freezer and defrost to separate. 

I had a leftover patty, which I brought to work today and pulled apart to dress up some "eh" leftover pasta I had from a carb craving yesterday.  Styrafoam sensations!  These would taste so good sliced up and rolled into a wrap with some veggies and hummus, or spinach-artichoke dip, or just whatever you can scrape out of the fridge. 

When Matt was retrieving the patties out of the freezer last night, he also found another Costco treasure:  a barbecue-ready tri-tip steak.  "What should we do with this?"  he asked.  The possibilities were daunting:  served simply with baked potatoes and green beans, chopped up and used in quesadillas, even made into an Asian-style steak salad.  Or... some really amazing sandwiches.  Matt opened up the garage to barbecue the steak just a step from a springtime downpour, while I prepped the ingredients I'd picked up at Trader Joe's:  wheat baguette for Matt, soft and delicious pita bread for me, piquant arugula, slightly sweet peppadew peppers and homemade tzatziki with crumbled feta. 

When the steak was barbecued through and rested, I sliced thinly and added to our awaiting breads to make a steak baguette sandwich I wish I had a cafe to sell it in, and a gyro-style sandwich for me.  I served mine alongside a roasted vegetable and couscous pilaf, and Matt has elbow pasta et fromage a la Kraft.  After making an entire long baguette's worth of sandwich and two gyros (leftovers for lunch tomorrow), there was still a nice hunk of steak left to make those stupendous steak quesadillas.  Not too bad for about $15 worth of steak.  Dinner was cleaned up and dishes were done just minutes after were were finished chowing down on our fast and fantastic dinner. 

Sandwiches are the even simpler, summertime-ish version of the hearty winter one-pot meal.  Try mixing up your meats and breads, and it'll take a while before you get too bored with this easy meal solution.  It's not the world's most original idea, but I think Earl Sandwich was indeed on to the essence of a bustling, hungry universe.

Saturday, March 19, 2011

Cake and Beer

I wanted to write about these a couple days ago, but there was a double-wallop of my first memoir class and the For Japan with Love blogger's day of silence.  The Japanese culture and its people have been a huge influence on my life, and their resilience during this unimaginable travesty is incredible.  Even though they have demonstrated such strength in the face of devastation and loss, they need our support.  If you are able to help, please lend your support to one of the organizations helping the people (and kittens!) of Japan.

All right, back to your regularly scheduled gluttonous musings.

Because of the aforementioned class on Thursday, I still haven't gotten my St. Patrick's Day corned beef and cabbage fix.  I came to terms with that, but I wanted to bring a little festivity to the day.  Just like on Mardi Gras, I've had to find bits and pieces of traditions in the face of the wonderful (but crazy!) trifecta of work, school and class.  What's the best way to distill celebration into a simple, portable package? 

CUPCAKES!!!!!!

Ah, cupcakes.  They've sadly become cliched since they skyrocketed to crazy popularity since Miranda and Carrie chowed on New York's Magnolia Cupcakes during the Aiden days.  Oh the Aiden days, when I was still only watch the series when HBO released a season on DVD.  Cupcake bakeries sprouted up all over the country, along with completely unnecessary cookbooks and curious cupcake couriers (ok, yes, I do want one).  Still, they are easy and clean to transport and serve, and to me taste a little more special than a slab of regular cake--each cupcake is frosted and topped by hand, making them individually special.  You have to put love in every single one.

A few years ago on Easter I made a dark buttermilk chocolate cake that used dark beer in the recipe.  I thought something similar would work well in cupcake form, topped with Junior Mints (because the flavor just screams green to me).  I used two products that are absolutely Irish to me:  the aforementioned Guinness, and Kerrygold Butter.  I probably wrote a hundred articles and ads for Kerrygold Butter while I worked at the specialty food company, touting its outstanding richness and creaminess, the result of well-loved cows grazing on the lush fields of the Emerald Isle.  The golden butter makes cakes fluffier, cookies chewier and pastries flakier.  It wasn't difficult because I totally believe it's true.  You could eat this stuff with a spoon and be happy, although probably incurring a heart attack.  Good butter does good things, especially when you're baking.

The beer is added to the whipped butter and sugar, which froths the dough up into what comes out looking almost like a mousse.  At the very end gently fold in whipped egg whites, which puffs the batter up even further.  It's a batter that needs to be handled with care, so don't overwork it in the Kitchen Aid or with the spoon.  You'll kill all those fragile bubbles that result in a light cake with a grown-up bitterness from the beer, coffee and cacao-heavy chocolate.  It's a pretty surprising cupcake, that's for sure.

The recipe calls for more bittersweet chocolate in the ganache, but I didn't want the cupcakes to be too bitter, so I used Toll House chocolate chips instead.  I was happy with this choice, since I love dark chocolate, but don't like feeling like I'm chewing on nibs.  The original recipe also instructs you to use cake rounds and create layers, but it makes exactly 24 (2 muffin pan's worth) of cupcakes.  Just bake them together for about 24 minutes, or until a toothpick comes out clean.  Since you don't need quite as much ganache to do cupcakes as you do a big layer cake, I've cut it in half from the original recipe.  I ended up dumping tons of my leftovers down the sink, and nobody wants to see gorgeous, creamy chocolate go down the drain.  I could probably be arrested in France for letting that happen.  I'm sorry.

I was kind of bummed when I discovered my translucent green sprinkles got lost in the dark ganache, but I tried to be festive.  Notes for next time, I suppose.  I didn't hear any complaints outside of the ones inside my head. 

Promising your friends and family (but maybe not children) cake and beer is a sure way to endure yourself to even the most hardened holiday haters.  I think it's a much better way to observe St. Pat's than watery green beer, with much less of the hangover.  No promises about sugar comas, though.

Guinness Dark Chocolate Cupcakes

(adapted from original Bon Appetit recipe)

Cake:
  • 3 ounces unsweetened chocolate, chopped
  • 2 1/4 cups all purpose flour
  • 2 teaspoons baking powder
  • 1/2 teaspoon baking soda
  • 1/2 teaspoon salt
  • 14 tablespoons (1 3/4 sticks) salted butter, room temperature (Kerrygold!!)
  • 1 1/4 cups plus 3 tablespoons sugar
  • 3 large eggs, separated
  • 3/4 cup Guinness beer
  • 2/3 cup freshly brewed strong coffee

Ganache:
  • 1/2 lb Toll House Chocolate chips
  • 1 cup heavy whipping cream
  • 1/2 tsp ground coffee

    For cake:
    Position rack in center of oven and preheat to 350°F.  Prepare 2 muffin pans by placing cupcake liners in each depression.  Try not to use Halloween ones like I did.  Kinda dorky. Place chopped chocolate in medium metal bowl. Set bowl over saucepan of barely simmering water and stir until chocolate is melted and smooth. Remove bowl from over water and set aside.
    Whisk flour, baking powder, baking soda, and salt in medium bowl to blend. Using electric mixer, beat butter and 11/4 cups sugar in large bowl until fluffy and pale yellow, about 2 minutes. Add egg yolks 1 at a time, beating until well blended after each addition. Beat in lukewarm melted chocolate, then stout and coffee. Beat flour mixture into chocolate mixture in 2 additions just until incorporated.
    Using clean dry beaters, beat egg whites and remaining 3 tablespoons sugar in another medium bowl until stiff but not dry. Fold 1/3 of egg whites into cake batter to lighten, then fold in remaining egg whites in 2 additions. Divide batter into muffin pans by filling each cup about halfway.
    Bake cakes until tester inserted into centers comes out clean, about 24 minutes. Transfer cakes to racks and cool in pans 20 minutes.

    For ganache:
    Place chopped chocolate in medium heatproof bowl. Combine whipping cream and coffee in medium saucepan. Bring cream mixture to simmer over medium-high heat, whisking occasionally. Pour cream mixture over chopped chocolate; let stand 1 minute, then whisk until chocolate is melted and mixture is smooth. Chill chocolate frosting until slightly thickened and spreadable, stirring occasionally, about 2 hours (or for quick chilling, place frosting in freezer until thickened and spreadable, stirring occasionally, about 30 minutes).  Use to top cupcakes after they have completely cooled.

    Top each with a Junior Mint, or a Girl Scout Thin Mint Cookie would also be diabolically delicious.

Tuesday, March 15, 2011

I Love Processed Food!

Astute readers of Eats of Eden will know that I have gone a long time without a food processor.  I was frustrated and embarrassed by this lack of pulverization ability, and tried to cover it up by touting the virtues of a good hand-dice and such.  Which is still true (knife skills are great), but there are some things you just can't do without a good, powerful food processor.  Pesto's a good example. I have never been able to get a batch of pesto to work in the blender.  Many sauces require its pureeing superpowers, and I've had to seriously change or just skip over recipes that have required it in the past.

This Christmas, I opened up a lumbering box bearing the beautiful Cuisinart logo, and within waited a brand-new food processor BFP-603!  It's also got a little blender, for when I don't need to get out the huge Kitchen Aid monster from the garage.  I gave the box many hugs and whispered nothings, hinting at the torrid love affair we would have. 

I think it was starting to doubt my sincerity, because it's been sitting idle between the never-used toaster and coffee pot, creating a trifecta of underutilized small kitchen appliances.  Meanwhile, the Griddler I use every week lives in storage under the counter.  Don't ask me about my logic.  That's just the way things work.

Most of my processor-happy recipes were in hibernation, waiting for summer to make all of the fresh herbs and vegetables popping up into sauces, dips and marinades.  Still it stared at me every time I went into the kitchen, nagging me to give it a try.

One of the things I've always wanted to try making, but never have, are homemade veggie burgers.  I've seen a few Food Network chefs do it, and maybe a couple recipes in magazines.  It always seemed like kind of a pain, and you needed a food processor to pulverize the many ingredients into a smooth, malleable "dough."  This weekend though, with a little time on my side and a lot of hungry to take care of, I decided to go for it.  I searched on FoodNetwork.com for a recipe, but all that came up were Sandra Lee-esque tips for dressing up Boca patties submitted by the Morningstar Farms Corporation.  That seems uncomfortable and ominous to me.  This recipe brought to you by a greenwashing subsidiary of Kelllogg Corporation!  (Sorry, anything that ginormous trying to feed us kinda freaks me out.)  Either way, they weren't patty recipes, they were just topping tips.  I can figure out toppings on my own, thanks.  But that whole "put a pineapple on it!" thing is really inspiring.

Once you have all the ingredients out and ready, you're basically embarking on a quest of destruction.  Mash the beans!  Puree the onions!  Squish it all together!  If you're coming into the kitchen angry, this is a great recipe to try. 

With the basic recipe ideas in place, I could see all kinds of opportunities to customize these patties to the flavors you were craving at the moment.  White beans and basil would make a Burgerville-style Yukon burger, which would be divine with some garlic aioli.  Some lemon juice and feta with a mix of navy and garbanzo beans would make a great Greek-style burger, which you could even serve pita-style with tzatziki.  It's almost enough inspiration to make a girl want to go vegetarian. 

I said almost.  But now I'm hungry for bacon.  You could totally serve these with bacon and guacamole, thus negating all of the healthiness you've spent all the time and ingredients creating. 

Anyway.  There are a couple advantages to taking the time to make your own veggie patties versus buying them at the store.  For one thing, they crisp up much nicer in the pan while still being so fresh.  They don't just kind of sit in the pan like a hockey puck.  You get a sear on the beans and rice that gives it a nicer texture, so when you have that slightly-crunchy outside and dense, softer inside, it's much more interesting.  Secondly, being made on-premesis by hand and with ingredients your eyes can certify as all-natural makes it much more flavorful.  And look at this picture!  There's a bean!  A real bean that I didn't mash enough!  Ah, the personal touches. 

If you have a food processor, I'd highly recommend giving these a try.  They warm up great in the microwave after the initial sear, making them great leftovers during the week (as this picture captures me enjoying at my desk on a bagel thin, much more unattractive but infinitely healthier than the beautiful artisan brioche bun Matt got to eat).  Always pack your lettuce separately, or else it gets all squished into the condiments and wilty.

You're welcome.

Ultra Awesome Veggie Burgers (from allrecipes.com)
Ingredients:
1/2 cup uncooked brown rice
1 cup water
 
2 (16 ounce) cans black beans, rinsed
and drained
1 green bell pepper, halved and seeded
1 onion, quartered
1/2 cup sliced mushrooms
6 cloves garlic, peeled
3/4 cup shredded mozzarella cheese
2 eggs
1 tablespoon chili powder
1 tablespoon ground cumin
1 tablespoon garlic salt
1 teaspoon hot sauce
1/2 cup dry bread crumbs, or as needed
Directions:
1. Bring the brown rice and water to a boil in a saucepan over high heat. Reduce the heat to medium-low, cover, and simmer until the rice is tender, and the liquid has been absorbed, 45 to 50 minutes.
2. Preheat an outdoor grill for high heat. Lightly oil a sheet of aluminum foil. Mash black beans in a large bowl with a fork until thick and pasty; set aside.
3. Place the bell pepper, onion, mushrooms, and garlic in the bowl of a food processor, and chop finely. Stir the bell pepper mixture into the mashed black beans. Place the brown rice and mozzarella cheese in the food processor, and process until combined. Stir the mixture into the black beans.
4. Whisk together the eggs, chili powder, cumin, garlic salt, and hot sauce. Stir the egg mixture into the black bean mixture. Stir in the bread crumbs, adding additional bread crumbs as needed until the mixture is sticky and holds together. Divide into 6 large patties.
5. Place patties onto the prepared foil, and grill until browned and heated through, about 8 minutes per side.

Sunday, March 13, 2011

Matt's Mardi Gras


Grad school is a lot like regular college, except you have to pay a mortgage, you don’t get invited to play Ultimate Frisbee at midnight, and your crazy roommate is actually your husband.  Some things stay the same, though:  you don’t get time to do all the things you want or need to do, and you start to fall into a zombie-like state of routine basic-level life maintenance and schoolwork.  You get swallowed into a paper and forget to do laundry, so you run your pants with a dryer sheet for 15 minutes before you run out the door.  You have to make a calendar appointment to remember and shave your legs.  And my food has gone the way of stereotypical campus cuisine with a slight upgrade (thanks to salaries):  instead of downing buckets of Top Ramen, it’s paninis.  Paninis every night, slapped together between job work and school work and toasted on the Griddler to at least give it a semblance of warm dinner-ness.
So when I was coming home late on Tuesday night, I expected another Panini waiting for me.  What I didn’t expect was Matt calling me up, asking “It’s Fat Tuesday tonight, right?”
“Yeah, why?” 
“Well, I was thinking…. We have that box of Zataran’s in the pantry, so I thought I’d make jambalaya.” 
Well that didn’t sound very stressful-weeknighty.  I was pretty excited, though.  I was feeling bad about missing out on putting together something delicious, like red beans and rice, because of getting home late Monday night as well.  Not being festive makes me sad. 
When I finally got home, I was so touched—Matt had sautéed chicken in Penzey’s Cajun spice, seared my favorite hot links, even gotten out frozen shrimp for that finishing touch.  The fact that he’d gone to so much trouble and thought, and made an effort to make sure I got my little taste of holiday even amidst having no time to think. 
With some flatbread we’d gotten at Seattle’s Metropolitan Market, it was a shortcut spectacular.  This time, it was my turn for a big happy smile and full plate picture.  Now if only he could write some prose for me, I might be able to get some sleep that doesn’t involve passing out on top of a book.

Sunday, March 6, 2011

Happy Eats-Avversary!

What a stupendous year it's been since I made the ultimate passive-aggressive commitment one year ago--to start a blog.  For those of you I didn't know or otherwise weren't around at the seems-like-a-lifetime-ago beginning, you can see my first entry by clicking here.  Since that first spazzy write-up I've actually started that immense writing program, adopted New Seasons as our default grocery destination, and indeed featured our cats a little more than is probably healthy or palatable to the readership. 

I agonized over how to mark this tremendous occasion.  I'd love to give each and every one of you beautiful followers a custom-painted Kitchen Aid mixer a la The Pioneer Woman, but I am sorely lacking in corporate sponsorship (shame on you, Williams-Sonoma and The Pampered Chef!  You're getting these plugs FOR FREE you know!!).  Instead, I figured I'd make a cliched but beloved play to the ultimate food blog moment:  making Beef Bourguignon.  As we all likely know, this is the quintessential impress-your-friends dish that Julie Powell pulled out from Julia Child's tome in Julie & Julia.  I've made this dish before, just a few months before starting Eats of Eden when I hosted a Julie & Julia-themed party.  Here are my friends Josie and Holly savoring the aromatic reveal of the boeuf.  They are now both vegetarians.  I guess that's not the best endorsement for my skills or the recipe.  I'll just go ahead and blame it on Taco Bell 88% beef instead. 

Beef Bourguignon has one of those infamous reputations as something so complicated, so time-consuming, so over-the-top and difficult that it's not practical to make.  It's so not.  I'll tell you what's difficult:  making sushi is difficult.  Just making the rice alone is a multi-tiered maze of tasks which, in the slightest deviation, can lead to a ruined product.  And that's aside from julienning all those veggies and properly-stored fish, assembling the rolls, getting them rolled up and sliced without looking too pathetic and lumpy.  Not to say it isn't amazing and fun, but it definitely deserves a BB-esque badge of bother.  Beef Bourguignon is basically beef stew that's had the sexy and expensive factor kicked up ten notches.  And no, you're not going to have to stay up until 2 am waiting for it to finish, either (so give me a break, Amy Adams.  Drama queen). 

For this honorary dinner I resurrected the same version I made at the party.  No, it's not Julia Child's original.  I don't feel right all of a sudden using her recipes when I never have; it seems disingenuous.  Instead, I refer to my very own Julia:  Ina Garten.  The Barefoot Contessa's recipe follows as you would expect:  good olive oil, the best bacon, 1/2 a cup of freaking Courvosier.  You also need to sacrifice an entire bottle of fairly decent wine, and we bought the organic chuck roast and vegetables.  But when Matt comments on the authenticity of the "real" carrots, it feels so worth it. 

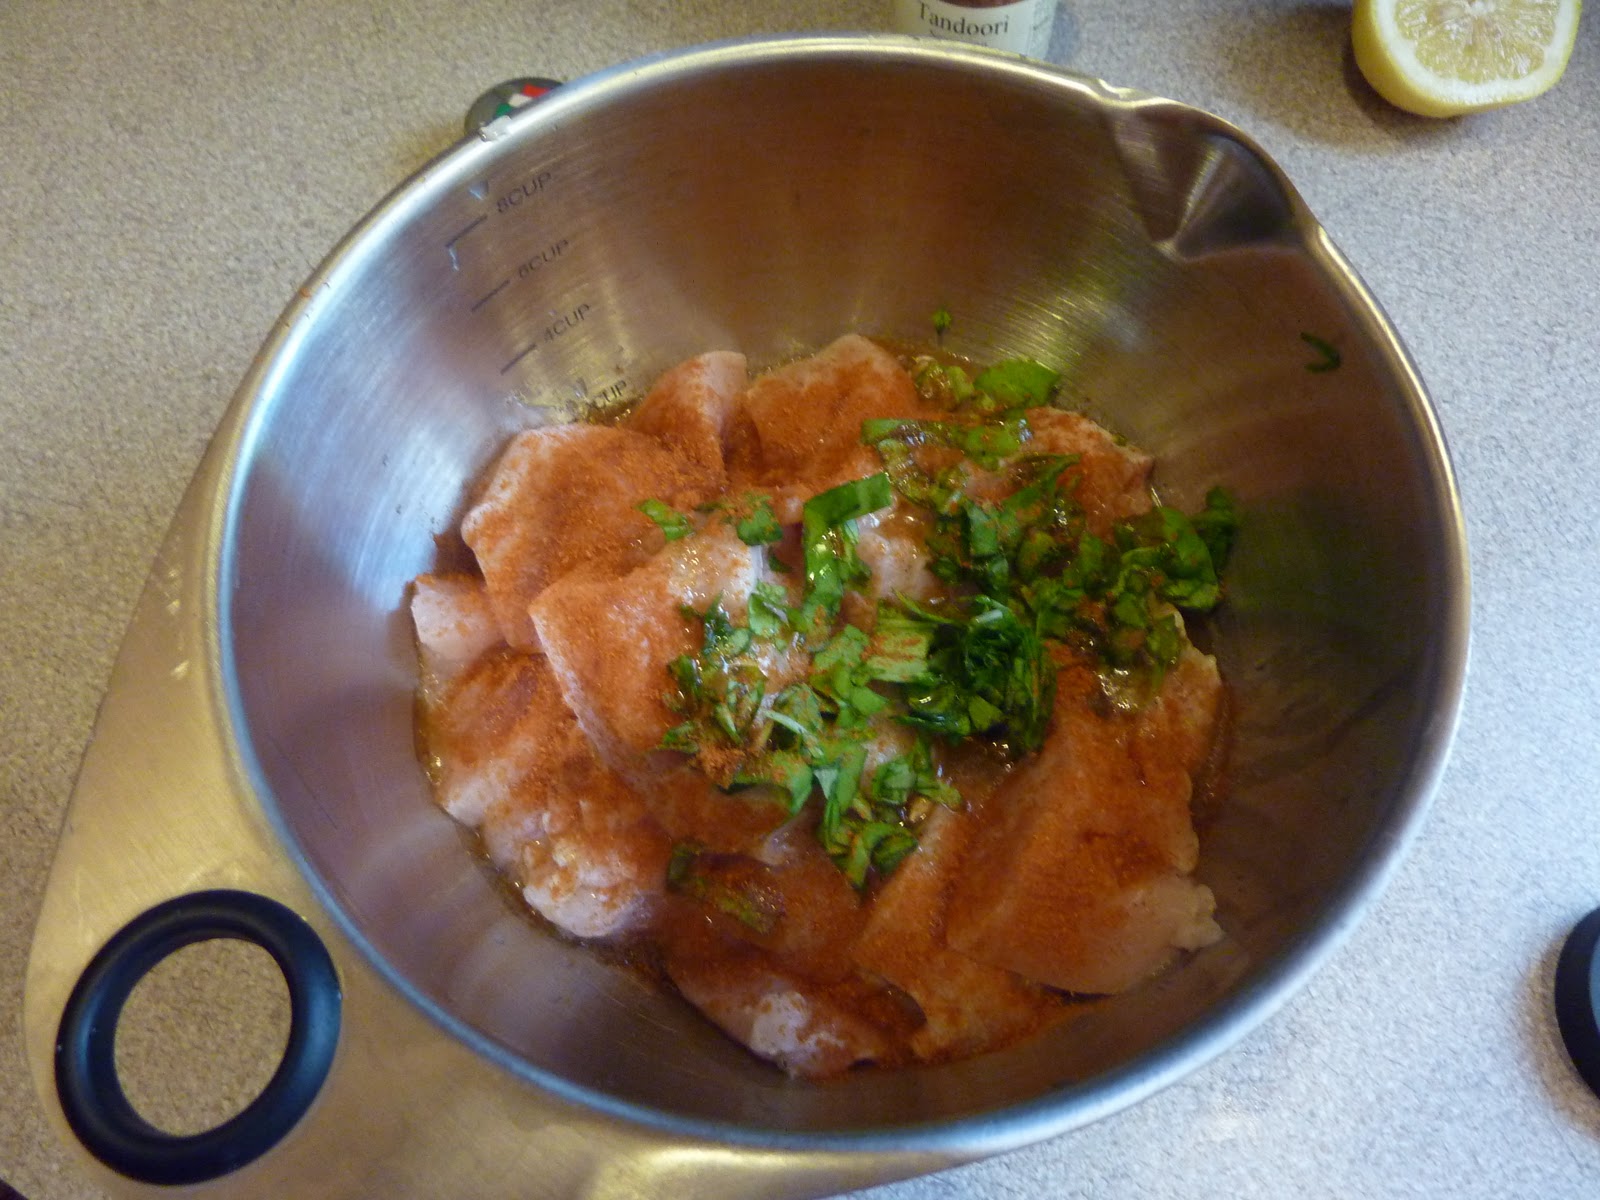
I prepped and assembled the dish last night, which is the way to go twofold:  it cuts up the cooking time, and allows the flavors to marinate and develop in the fridge overnight.  Here are the basics that cook down together in the great Le Creuset:  chuck patted dry, liberally salt-and-peppered and then browned in small batches of the rendered bacon fat and olive oil to get that nice crust that sustains through out the cook-down process, a whole mess of onions and garlic, carrots and lush mushrooms.

If your house is smelling kind of blah and you're out of candles, just start cooking up beef bourguignon.  From the first bacon fry to the onion sizzle, savory flavors permeate the space in layers.  And as the scents shift, the flavors in your eventual dish deepen.  It's just such a rich, productive cooking experience knowing this is going to be soo good tomorrow

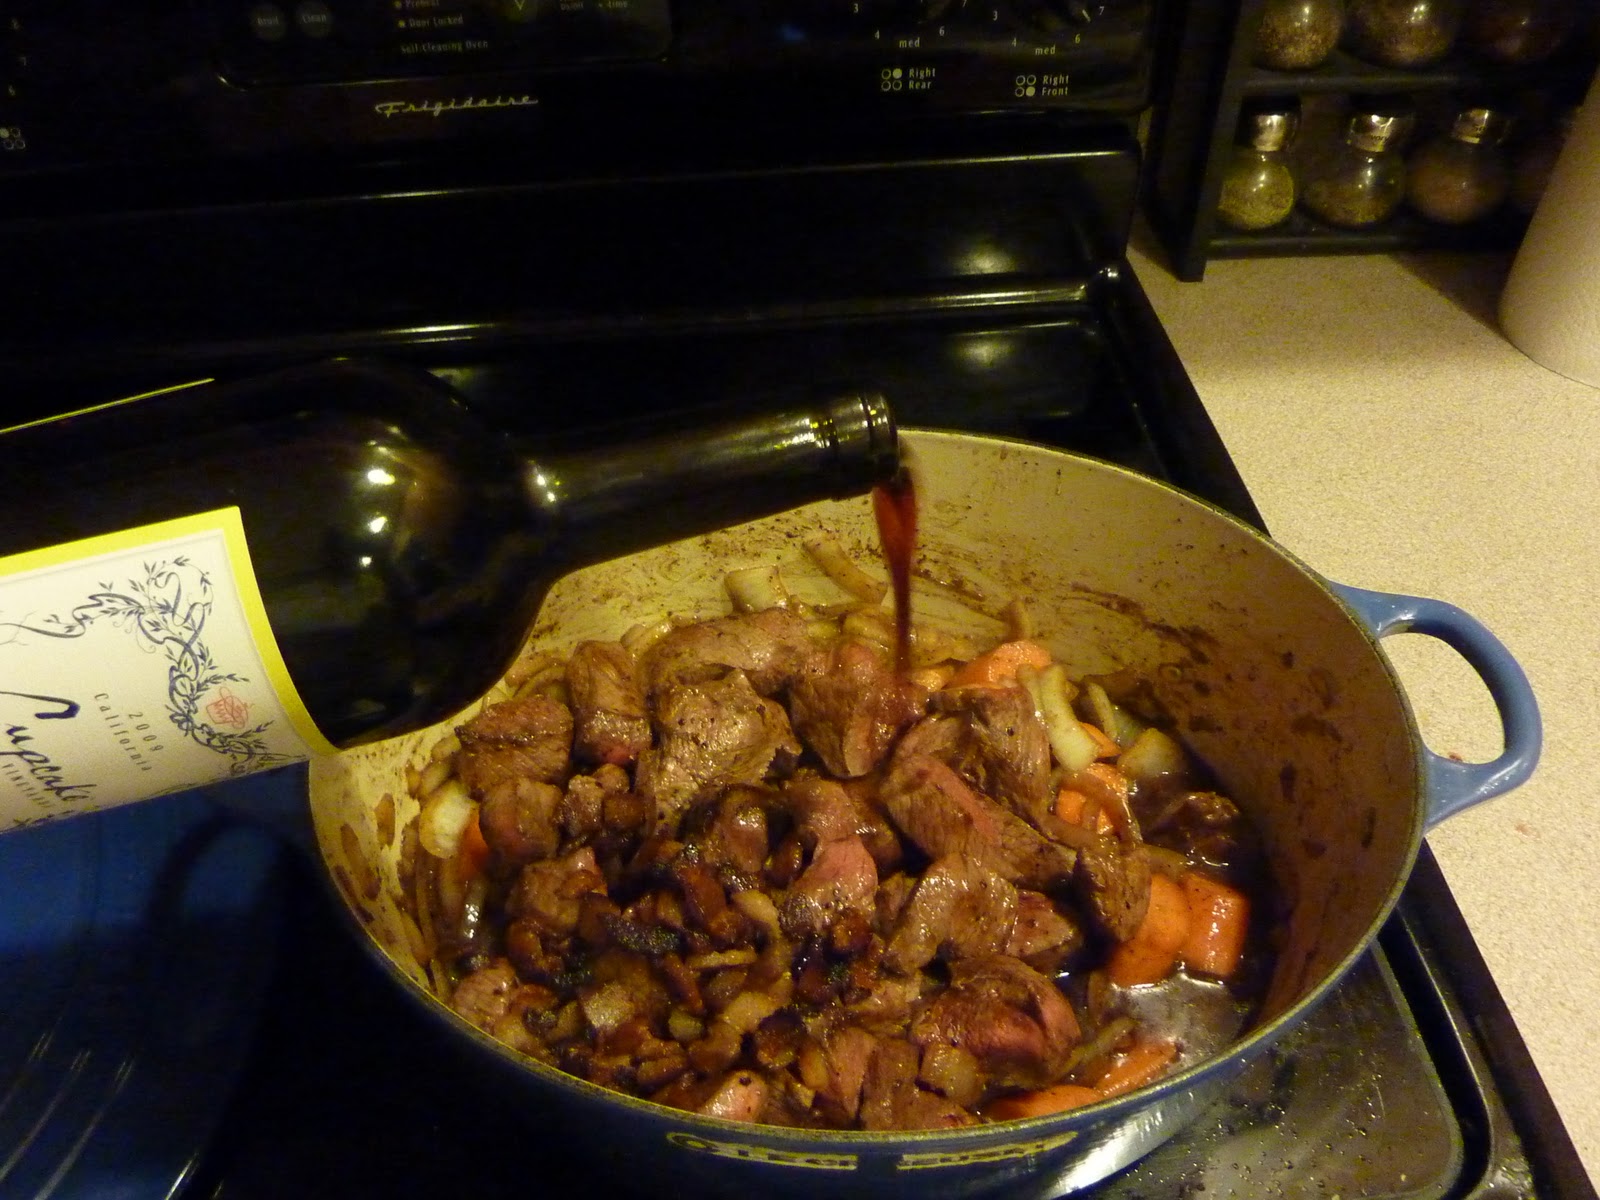
And then, just as everything is starting to marry and meld together, you pull out that entire bottle of rich red wine and dump the whole thing in.  Yep, keep going.  Don't stop.  Like legendary coq au vin, the meat melds overnight with the wine to become one with the wine.  The meat absorbs the red wine, the red wine absorbs the meat juices, and once you have a bite you can't imagine one without the other.

After cooking on the stove, the pot is baked in the oven for a little over an hour.  This is where I allowed the dish to cool and go in the fridge while we sat down to watch The Town

As we enjoyed the smell of promise from the living room, we discussed what exactly we should be serving this over.  My #1 vote was a fluffy bed of parmesan polenta, which I still think would have been mind-blowing, but Matt doesn't like polenta.  He was clamoring for potatoes au gratin, but I insisted that it would be much too rich.  Reminds me of those people in the South that eat their gumbo over potato salad.  I proposed a happy medium:  oven-roasted baby red potatoes, smashed to serve. 

The next day, after an impromptu flight in Matt's company plane to test a camera and an afternoon full of trying to write more of my canning story, all I had to do was take the Le Creuset out of the fridge, heat up the oven and allow it to come back to life.  I did have to saute the mushrooms in butter to add at the last stovetop simmer, and poke some holes in the potatoes, but otherwise it wasn't much more difficult than toasting chicken nuggets in the oven.  I just scattered the potatoes on my baking stone, rolled them in olive oil, salt and pepper and gave a good long 45 minute-ish stay in the oven.  They came out crisp on the outside, fluffy and velvety on the inside.  By this time, we were ready to celebrate.  I ladled the sophisticated stew over deep bowls of potato beds, sliced toasty La Brea bread (wasn't in the mood to reboot last weekend's bakery) and sat down to enjoy another serving of this classic dish. 

While Matt posed for his signature happy-food shot, he was joined by another anxious dinner guest.  They are both the stars of my blog, and loves of my life. 

Thank you again for reading Eats of Eden!  I hope that I've inspired you to try something you may not have done before, or at least ordered something new off the menu.  For me, this has given me an outlet to practice and play with writing without having to be too serious about it.  It's a blog, after all.  I don't think my sentences are going to be too scrutinized, but as each of them comes along I'm pretty sure the next ones slowly become better.  That's the whole way of craft, right?  Works with pens and pans.  Pick up and play with whatever you wish. 

My Julia's Beef Bourguignon


  • 1 tablespoon good olive oil
  • 8 ounces dry cured center cut applewood smoked bacon, diced
  • 2 1/2 pounds chuck beef cut into 1-inch cubes
  • Kosher salt
  • Freshly ground black pepper
  • 1 pound carrots, sliced diagonally into 1-inch chunks
  • 2 yellow onions, sliced
  • 2 teaspoons chopped garlic (2 cloves)
  • 1/2 cup Cognac
  • 1 (750 ml.) bottle good dry red wine such as Cote du Rhone or Pinot Noir  (I used Cupcake from Costco.  I'd buy something a little better than Two Buck Chuck... but not much better)
  • 1 can (2 cups) beef broth
  • 1 tablespoon tomato paste
  • 1 teaspoon fresh thyme leaves (1/2 teaspoon dried)
  • 4 tablespoons unsalted butter at room temperature, divided
  • 3 tablespoons all-purpose flour
  • 1 pound frozen whole onions
  • 1 pound fresh mushrooms stems discarded, caps thickly sliced
Preheat the oven to 250 degrees F.
Heat the olive oil in a large Dutch oven. Add the bacon and cook over medium heat for 10 minutes, stirring occasionally, until the bacon is lightly browned. Remove the bacon with a slotted spoon to a large plate.
Dry the beef cubes with paper towels and then sprinkle them with salt and pepper. In batches in single layers, sear the beef in the hot oil for 3 to 5 minutes, turning to brown on all sides. Remove the seared cubes to the plate with the bacon and continue searing until all the beef is browned. Set aside.
Toss the carrots, and onions, 1 tablespoon of salt and 2 teaspoons of pepper in the fat in the pan and cook for 10 to 15 minutes, stirring occasionally, until the onions are lightly browned. Add the garlic and cook for 1 more minute. Add the Cognac, stand back, and ignite with a match to burn off the alcohol. Put the meat and bacon back into the pot with the juices. Add the bottle of wine plus enough beef broth to almost cover the meat. Add the tomato paste and thyme. Bring to a simmer, cover the pot with a tight-fitting lid and place it in the oven for about 1 1/4 hours or until the meat and vegetables are very tender when pierced with a fork
.
Combine 2 tablespoons of butter and the flour with a fork and stir into the stew. Add the frozen onions. Saute the mushrooms in 2 tablespoons of butter for 10 minutes until lightly browned and then add to the stew. Bring the stew to a boil on top of the stove, then lower the heat and simmer for 15 minutes. Season to taste. 


Tuesday, March 1, 2011

Doughn't Hate

My mom is a Kneading Queen, Divinity of Dough and Princess of Patisserie.  She filled our dinner table and sandwich bags with homemade bread, biscuits and cookies while I was growing up, so of course it seemed normal and mainstream to my narrow experience (versus Matt, who asked me the first time I said I was going to try baking a loaf, "how are you going to make bread without a bread machine?").  Lately she's been on a cake kick, with my red velvet birthday cake and her birthday's coconut cake (that we got to sample) becoming legendary.  I was villainzed for weeks after not bringing back enough Tupperware-d slices.  After being treated to a breakfast of french toast made from homemade brioche-style bread on our recent visit, I was spellbound- and inspired. 

On a side note, my parents have the most impressive lineup of syrups I've ever seen.  Regular and sugar-free varieties, samples from artisinal fruit stands in Eastern Washington and Montana (where my favorite flathead cherry comes from), fancy Vermont maple from a farm run by our relatives several times removed... I don't think I'd be able to eat enough pancakes to sample them all.

Anyway.  Despite the several hours of driving and such, I was possessed with baking something.  French bread sounded great, and there was a recipe for Sriracha-Cheddar bread in The Sriracha Cookbook that I'd been dying to try.  And with the revolution in human existence that is the Kitchen Aid Mixer, I could do it all without collapsing from knead-injury.

Not that I am knocking kneading.  It can be extremely cathartic, and brings your mind and body together into the evolution of the ingredients and creation of the bread.  It makes the act of cooking physical, and therefore more real and present.  However, I am a huge arm-wimp.  The whole reason I quit ballet after one lesson when I was 8 was because, as I told my mom, "the teacher made us hold our arms up in the air too long."  Ugh, yuck.  So, unless I feel particularly inspired, I worship my beloved dough hook.

I've been using the same French bread recipe since that day Matt challenged my ability to bake bread without a specially-designed, self-contained contraption.  As long as you have viable yeast, it consistently yields plump, toothsome loaves.  You have to watch out with your yeast, or else you'll end up wasting hours of rising time and lots of flour to failures.  Check the expiration dates, and if you buy yeast in jars versus packets (the most economic option), keep it in the refrigerator after opening.  Taking a cue from Petit Provence, I've started to knead in extra flavors during the "jelly roll" phase (where the loaf takes on the look, and one more rise, into a baguette-style bread).  For this batch I roasted a head of garlic and sprinkled on some Herbes de Provence.  I think this is the most beautiful spice blend in the world, but I never find the chance to use it.  It's the kind of thing you use to crust a crown lamb roast, and I've served exactly zero of those.  Rolled up and sealed, the extra ingredients disperse and pop up by surprise in slices. 

The rising of the bread (three times in this particular recipe) never ceases to amaze me.  You have to cover it up, leave it alone, and trust that by the miracle of nature the little ball you whipped into reality will somehow double in size.  I always catch myself taking an extra, exalted breath when I lift up the towel, finding that the universe hasn't cheated me.  It's all grown up!  And the sick joy of destroying it all with a deflating punch?  Well, you're already played the God of Creation.  Vengeful God is fun, too!

Never get lazy and skip the egg wash.  It seems kind of dumb, right?  Why would I waste a whole, innocent egg just to brush on a loaf?  Won't it get brown in the oven on its own?  Yes, but not that golden, otherworldly lacquer that makes any bread so artfully appealing.  It's a touch that makes the feast of the eyes complete, which always makes the real eating process exponentially more fantastic.  

Cute bread baskets and lovely towels also assist.  Add oil and vinegar, savor.  Repeat infinitely.

Oh, but I wasn't done!  This crazy sriracha cheddar bread was still waiting to be made.  Since I've been making paninis so often lately, with my work and school schedule pushing me into the simpler cooking options, I thought this would taste wonderful grilled.  It involved whipping up a slightly sweet dough and then rolling it out for ingredients and a jell-rolling, very similar to the French bread technique.  The filling was, of course, sriracha sauce and grated cheddar cheese, which looked like homemade pizza.  The rolled-up loaf then had an additional 2 hour rising time (after its previous 2 hour rise before the rollout), which meant I got to catch some serious Oscar action.  Anne Hathaway, The Devil Wears Prada is one of my favorite movies, but I seriously want to smack you the face.  Not every person you introduce needs a spazzy arm-wave and shriek.  We get it, you're cute.  And James Franco?  Your apathy is contagious, and not in a good way.  Natalie Portman's matchy-match fringe earrings irritated the shit out of me.  I guess I need to put The King's Speech in my Netflix queue. 

Oh look, the bread's done!

Oh my gosh!  It's a loaf!  A real, puffy, perfect loaf!  Again, I just can't get over how it all actually works.  If you follow the steps, perfected over millennia, you get beautiful results.  We sliced into the sriracha loaf tonight (as I had this freaky, 24-hour-flu-of-death last night) for our sandwiches, and it was delightfully spicy kept in check by the dough's subtle sugar addition.  Toasted in the Griddler, the cheddar cheese started to melt a bit and caramelize a bit.  It also had that tender, just-sliced bite you only get from bread that's recently emerged from the oven.  It's just like how mom made, but with hot sauce.  I made her proud, my husband rave, and my cat intrigued.  What else could you want out of a Sunday experiment?